Showing posts with label quilting. Show all posts

Monday, March 6, 2023

A Quilt for Sherwood

Sherwood and I have never met.  Never shared "meat space" as the cool kids would say.

Back in the early-ish days of the Internet, there was a thing called Usenet.  There were a myriad of groups representing a broad range of interests.  In particular, there was a group called rec.arts.comics.strips where people that enjoyed comic strips got together to discuss comic strips.

You might call us "strippers" but we preferred the term RACSals.  Or I did.

Sherwood was there.  As was I.

We didn't agree on a lot of things.  Mostly we disagreed about politics.  We both loved comic strips.

It turns out that we shared a number of other interests such as photography, blogging, and a bit of Irish ancestry.  

I'm not one for calling someone a "friend" at the drop of a hat.  I am not Clintonian in that way.  Sherwood will groan and think "oh that Dann" if he ever reads this.  Some of you kids won't get it without taking a deep dive into the ancient American period of history known as the 1990s.

Despite those disagreements, we shared enough experiences over the years that I consider him a friend.  We are connected on Facebook where we touch base from time to time.

Courtesy of my love of comic strips, I have a significant collection of fabrics featuring the characters from Charles Shultz's "Peanuts".  It is not a small amount of my inventory.

I needed a new quilting project at roughly the time that Sherwood retired from his career as a professor of astronomy.  Retirees take naps.  Naps frequently require quilts.  And we both appreciated comic strips.

Viola!  Inspiration!

I am a big fan of Joe Cunningham and his "rock the block, album style" process for making quilts.  You can take his class (pattern-free quilt making) online and learn four different quilting processes.  I think his perspective regarding quilt design is interesting.

I've made one other quilt using that process for Baby Rose.  That quilt used a stack of fabrics that varied by color, but shared a general visual texture between the various colors.  They all had an imprinted bubble pattern.  They all had color shifts that were similar in process even if they differed in colors.

Sherwood's quilt uses several fabrics that differ quite a bit.  Most of the fabrics have Peanuts characters.  Most of them include some shade of green.  But there wasn't really enough to tie them together in the same way that young Miss Rose's quilt came together.

Color selection aside, I also learned a bit about strip design when using the "rock the block, album style" process.  Joe's process is to use random-width strips.  The only important feature is that the strips have parallel edges.  Then you sew the strips together to make a wide panel.

The rest of the process involves cutting these new panels across the seams into more strips.  These new strips are assembled into strips, cut into smaller strips, and finally assembled into squares.

Take the class to get the details.  It is worth the price.

With all of this slicing and dicing of fabrics, a narrow strip used in the first panel of strips can be a pain in the arse.  It will probably get sliced and diced down into a very small piece indeed.  

Every quilt is an opportunity to learn.  This time I learned to value a bit of restraint when selecting the number of fabrics used in a quilt and to avoid using narrow strips when building panels.

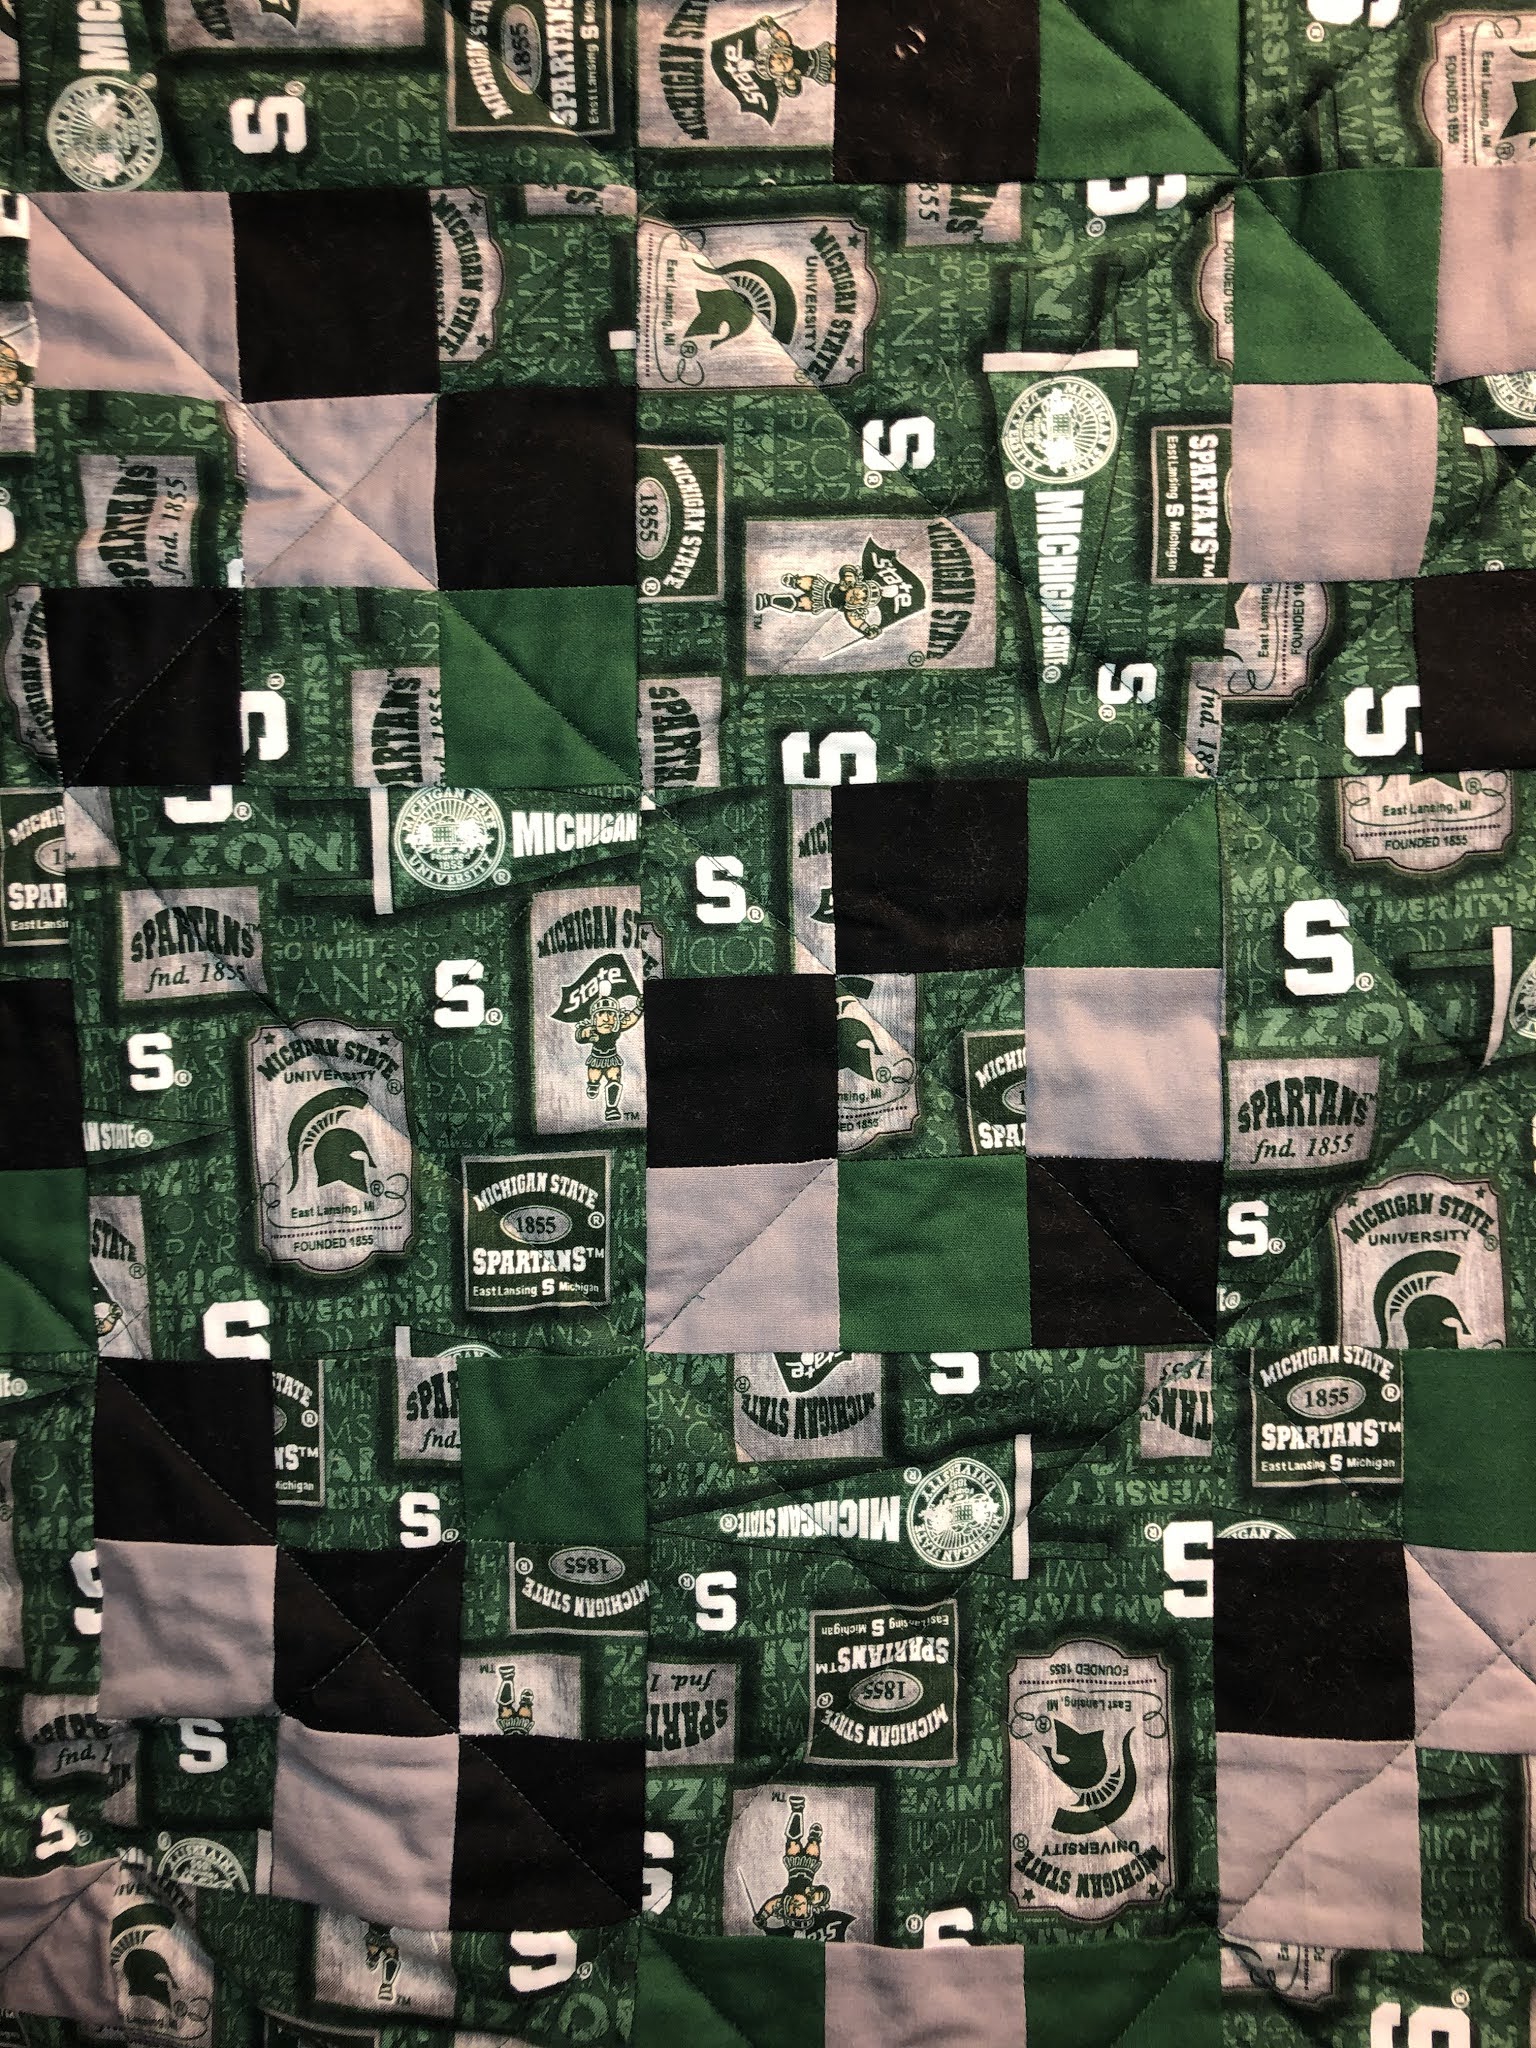
With all of that said, I like the way the quilt came out.

Sherwood's quilt - click to embiggen

Sherwood's quilt - click to embiggen and check out the stitching pattern

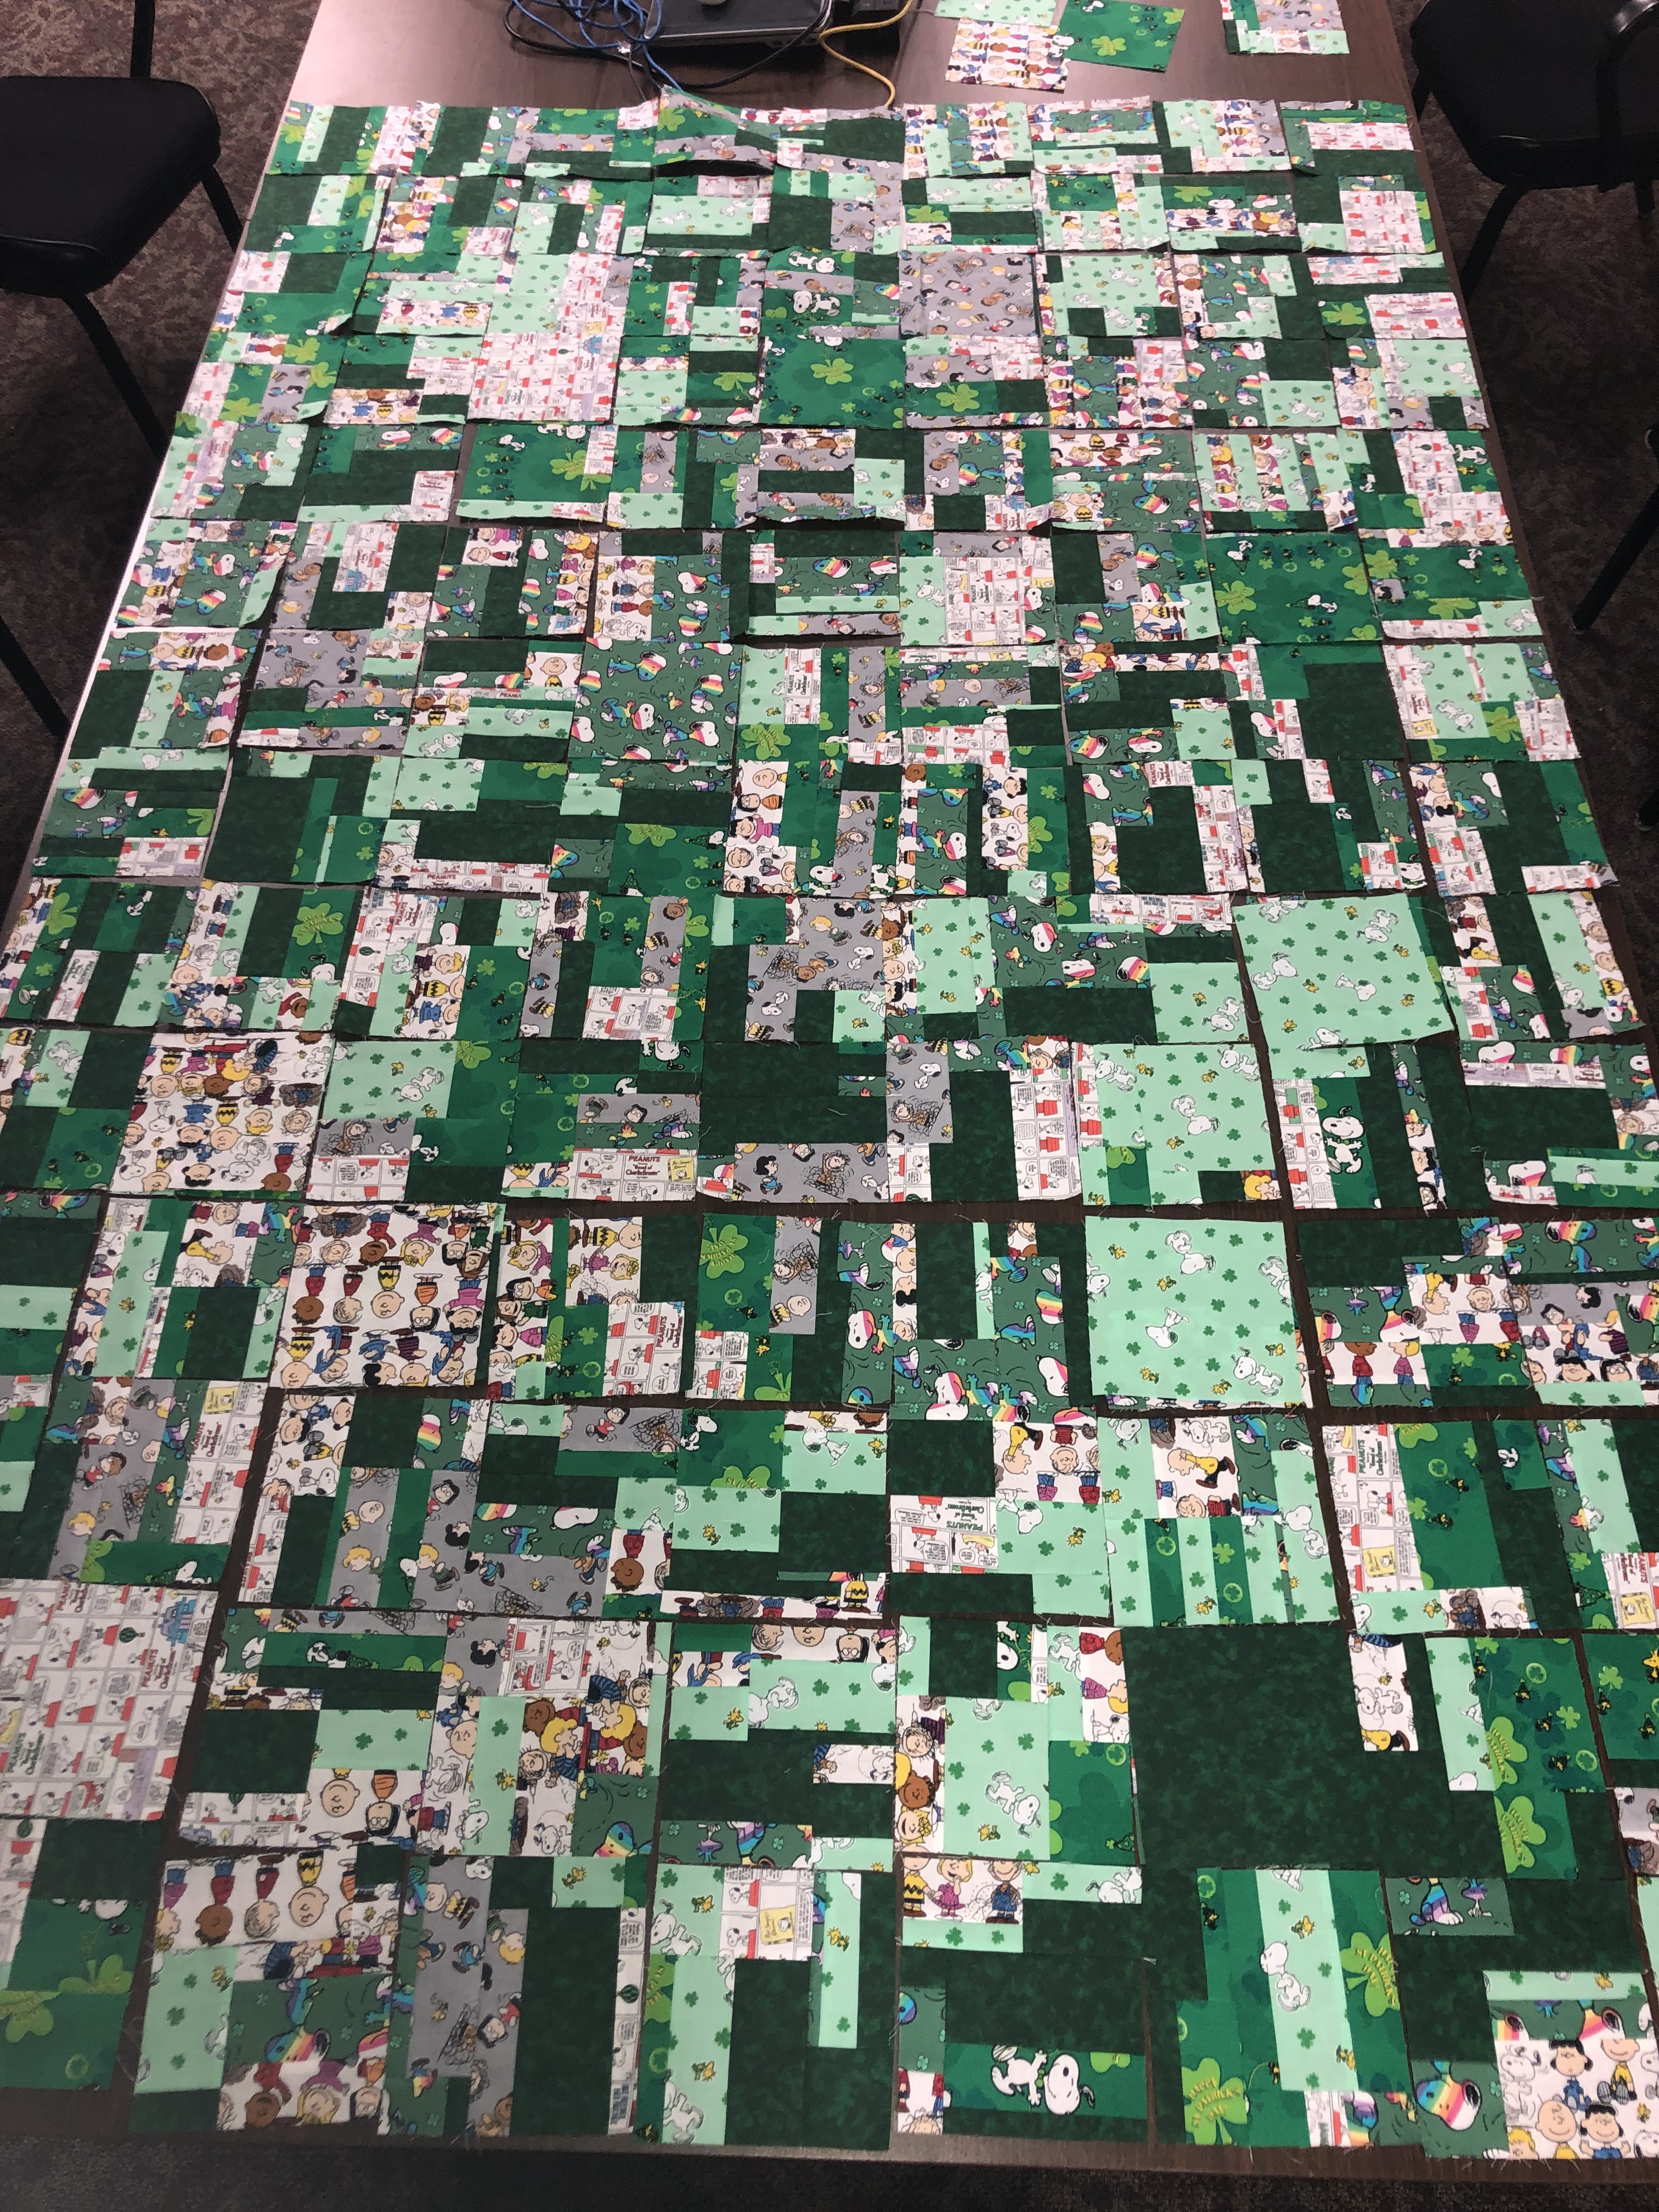
Sherwood's quilt - laying it out - click to embiggen

A modest update.  I always ask for a photo of the quilt with the recipient for my little bit of posterity.  Sherwood was kind enough to provide a few.  The first one is himself and his quilt.  The second two show some details of the quilting pattern used to nail the whole thing together.  

For the record, I had someone else do the pattern quilting.  I made the top and did the binding.

As above...click to embiggen.


Sunday, January 29, 2023

A Quilt for Wesley

Having successfully produced a first progeny, one of my colleagues and her husband decided to take another stab at it.  The product of their labors...literally...is a fine young man named Wesley.

For his quilt, I opted for a selection of fabric featuring Peanut's characters.  

The whole quilt modeled by my beloved bride.  Click to embiggen

Single panel.  Click to embiggen

This pattern is known as "log cabin".  It was the first pattern that I learned and it is one that I enjoy using.  You can do so much within the confines of that pattern.  

Unfortunately, I ran into the quilter's nightmare with this quilt.  There are lots of different approaches to laying out a log cabin quilt.  You can rotate the panels to make several different patterns.  But the ever-present risk is that you can end up unintentionally making swastikas.  This particular fabric selection seemed to make it hard to use any of the other layouts that I know without making a swastika here and there.  There are other quilting patterns that have similar problems.

And well, I wouldn't do that to young Wesley.  So here we are.  He approves!


Young Master Wesley.  Yup.  He's a keeper.  - Click to embiggen

Master Wesley's canine compatriot also approves! - Click to embiggen

A Quilt for Holly

 As detailed elsewhere, I had made a quilt for my sister-in-law Tracy.  It was supposed to be a Christmas present last year.  But my beloved bride wanted to give one to my sister-in-law Holly at the same time.  So off we went to the fabric store!

Oh the pain!  The torture!  To have to buy fabric!

The pattern is the same basic pattern that I used for Tracy's quilt.  The big difference was in the fabric.  Holly is a Detroit Lions fan.

The ever-stylish Holly modeling her quilt - click to embiggen

I did one thing differently on this quilt.  I always complain about using fabrics that are not dimensionally stable.  That fleecy backing material is no exception.

This time around, I used some spray adhesive to hold the backing material to the batting.  That made it quite dimensionally stable when I was quilting the layers together.

Merry Christmas, Holly!


Sunday, December 20, 2020

What Does A Quilt Cost

 A friend asked a question of me that I had not heard before.  They asked if I was accepting orders for quilts.  The short answer to that question is "no", but there is a longer answer.

I have read about other quilters opening up the possibility of creating a quilt in exchange for cash.  The responses to the associated costs are generally a sense of shock with a sprinkling of outrage.  When the costs of a quilt get broken down, it suddenly becomes a less attractive option.

Most of my quilts are created for babies. They measure a little under 5 feet by 5 feet.  That works out to 25 square feet or roughly 2.8 square yards.  

Most fabric comes on a bolt that is close to 40" wide; that a bit over 1 yard.  We can talk about yards of material as a linear measurement or an area measurement and the result is essentially the same.

For most of those baby quilts, I buy somewhere between 4 and 5 yards of material.  I buy material on sale when I can get it.  I also know a couple of online stores where I can get pretty good prices from time to time.  But there are also times when I pay FLEET pricing; Full List Each and Every Time.  As a gross average, let's use $10 per yard of material.  That works out to $50 for just the material to make the top.

Then there is batting that goes in the middle.  I generally get it on sale.  Using $15 per yard, then we have another $30 as you always get a little more than you really need.

Finally, there is the backing material.  Due to the size of the quilts, you have to use a wider material width.  Those easily run $12 per yard and sometimes more.  There is another $24 in material cost.

The total fabric cost then runs to roughly $100.  That doesn't include thread or any of the other consumable supplies.  It also doesn't cover the cost of time.  A baby quilt takes me roughly 20 hours to complete.  What is the value of my time based on the quality of work that I do? 

Consider that fast food joints in my area are hiring people with no experience at $10 per hour.  Consider that shops are hiring people in my area with no experience at $14-16 per hour.  There are costs (i.e. employers portion of the payroll taxes, etc.) on top of that.

I've made over 20 quilts and learned a bit on each one.  Mostly I've learned what not to do, but that is another story.

While my work won't win any awards, it's also not exactly beginner level work either.  I'd feel pretty good about asking for $20 per hour or about $400 for a baby quilt for labor.  That makes the total about $500.  

If we are talking about a queen or king-sized quilt, then you end up multiplying that by at least 3.  It's a lot of work and material!

And that is why I give quilts away.  I know I've done my level best and have provided them with a visually interesting piece of work.  It's the one part of the process that is mine to control.  I don't have to put a price tag on the quilt.  The kind words of thanks and stories about the kids that grew up dragging their quilts around the house are more valuable to me than the cost of the materials and time spent making them.

If I start doing it for money, then the entire activity becomes something else.  Something that has to be justified rather than appreciated. 


Friday, December 18, 2020

A Quilt for Tracy

 This one won't go on Facebook until late in 2021.  Why?  Because my sister-in-law won't receive it until Christmas of 2021.  Don't ask me.  I just make 'em.

My beloved bride wanted me to make a quilt for my sister-in-law, Tracy.  She found some Michigan State fabric.  Apparently, Tracy is a fan.  Who knew!

I wasn't sure what I wanted to make and as time was short at the end of the year, I opted for a pretty standard approach.  I used a solid block of material alternated with a 9-patch of fabrics.  

We had four different fabrics.  I created a mix of three-square strips and then semi-randomly assembled sets of those strips into a 9-patch.

The result was pretty easy as well as visually interesting.


Now my beloved bride always thinks that the back of a quilt should be "soft".  "Soft" fabrics like flannel or fleece are a bear to work with as they aren't dimensionally stable.  They will stretch if pulled.  A stretch back means that the front will pucker when the back is allowed to relax.  Alternatively, if you don't have enough tension on the back, then it will pucker.

I'm not terribly happy with the back on this quilt.


In any case, don't anyone tell Tracy. We wouldn't want to ruin next year's Christmas for her!

A modest update.  Christmas 2021 came and went with the quilt not being presented.  Why, you may well ask.  Because I found out late in the season that a quilt was also needed for my other sister-in-law, Holly.  I just didn't have the time to get that second quilt completed.

But this is a new year and quilts have been gifted.  Here is Tracy with hers.

Tracy with her quilt.  Click to embiggen.


A Quilt for Baby Rose

 Another nephew and his beloved bride decided to have a baby this year.  They are doing it the old-fashioned way and are waiting for the doctor to tell them if the baby has a port or a dongle after the little squab has been delivered.  Those crazy kids.

I had my eye on the fabrics in this quilt right about the time that I had time to work on a new quilt.  I have also been aching to produce a quilt using Joe Cunningham's "Rock the Block - Album Style" approach.  Joe doesn't really teach a pattern as much as he teaches a concept of artistic discovery.  He has a class on Craftsy.  It's actually a class that presents four different variations on a general approach.  It's a very good value if you are into quilting and want to expand beyond just following someone else's pattern.

I used a bit of this general technique on the quilt that I made for young Lincoln earlier this year.  But now I've had a chance to use Joe's approach on a complete quilt.

The fabrics come from a series by Wilmington Essentials called Gems Bubble Up.  If you look close, you can see the bubbles.  They're everywhere!

I did try to do a little free-hand quilting.  It didn't turn out very nice.  So I went back to the old standby...straight lines!


I learned a couple things this time around.  One is to be careful about using too many narrow strips.  If you buy the class, you'll know what I'm talking about.  There is such a thing as too many narrow strips just as there is such a thing as too many wide strips.

I also learned to mix it up a bit.  I made a bunch of sections with narrower strips and a bunch of sections with somewhat wider strips.  Then when it came time to put things together, I tried to put the two sections together to generate some unusual patterns.

Lastly, make lots of extra pieces. I thought I had way too much fabric.  It turns out I barely had enough.  I was hoping to have some extras so that I could play around with the pieces when it came time to put them together.  Not having a stack of spares restricted my results.

My next quilt will probably use some of the techniques that I used in this quilt.  I found an image.  I have a plan.  Y'all will have to wait and see!

A Quilt For Kingston

 Our nephew and his girlfriend decided to bifurcate this year.  As one does, one makes a quilt!

As luck would have it, we made a run to Indiana earlier this year.  This was in late May and the lockdown had gotten us down.  Indiana was open for business.  We hopped over the border to do a little shopping and to have some dinner in a restaurant.

While out and about, we found a little hole-in-the-wall Joann's.  It was easily the smallest Joann's that I've ever seen.  And I've seen a few, too!

While wandering around the fabric, we came across the two fabrics that were used for this quilt.  We had no idea how it would get used or who would be getting it.  We didn't even know about our nephew's pending baby.


Lo and behold we got the news a couple months later.  For a change, I didn't have to run off to find fabric as we already had it in inventory.

As things worked out, the quilt was delivered a bit before Kingston.  Our nephew and his girlfriend do good work.


Welcome to the family, King!

Monday, March 30, 2020

A Quilt for Aedan

I'm still getting caught up on photos of my various quilting projects.  It turns out that I've had to ask for photos from various recipients because I forgot to take/keep photos on my own.

It looks like 2016 was in the middle of my time off from quilting.  The only quilt that I could find from 2016 was for young Aedan.  Here he is a few years on with his brother Liam holding up the quilt for all to see.


And here is his brother, Liam, way back in the day claiming the quilt as a matter of older brother's privilege.  I'm given to understand that such a maneuver is a bit harder to complete these days.

Tuesday, February 25, 2020

A Quilt For Jude

A couple of good friends had a baby a couple years back.  And I made a quilt....surprise!

In this case, I had a bunch of fabrics in my stash that were good for a baby quilt.  But I didn't have enough of each one to go with my usual log cabin approach.

So what's a quilter to do?  Improvise!


In this case, I coupled wide strips of white with narrow strips of various other materials.  Once those were stitched together, I cut them at the same width as the narrow strips.

I then used wide strips of colored material with narrow strips of white.  Those got cut to the width of the colored material.

Then you match a narrow strip with a wide strip to make a square.  Lay out the squares in a pleasing manner and voila...a quilt is born.

I used a minky fabric for the backing.  That worked out a bunch better than some of my other quilts.  I always have a problem with the cotton backing wrinkling if I don't work hard to get all the loose fabric out of it.

As a bonus, I was able to incorporate some material from his older brother's quilt in his quilt.  I'm pretty happy with how it turned out.  And Jude is pretty cool, too.

Jude - his own self

Sunday, February 23, 2020

A Quilt For Everet

So a long time ago, I made a quilt.  And I took one photograph.  I did not record the recipient.

And thus began a 4-year quest to figure out who the heck got that quilt!  Most embarrassing for me.

His dad cleared up the mystery and now I can add it to my record. 


A Quilt For Emery

I'm working at getting my quilt entries caught up.  This beauty was for our grandniece, Emery.  She's a few years older now and cute as a button.


A Quilt for Lincoln

My most recent finish.  This is my second quilt for 2020 and my first baby quilt of the year.

The design was inspired in part by the recent Initial K finish posted over at Reddit.  The Initial K pattern is Vaquero.

I did my own thing with the arrows...details below.  The blocks use the technique developed by Joe Cunningham for his Rock The Block - Album Style quilt.  His lesson actually includes (3) different quilting techniques; including Rock The Block.  I've been wanting to try a full-blown Rock The Block quilt, but haven't really had the chance.  This quilt was my first opportunity to test out the technique.

I learned a few things.  One piece of advice for Rock The Block, don't use too many narrow strips.  And really don't use narrow strips that are adjacent to one another.  Another piece of advice is to plan on making many more blocks than you will need to finish the quilt.  There are many opportunities when you are trying to make a specific cut that ends up right next to a seam.  You need to have some flexibility in executing Joe's technique.

The first photo is from when I was getting the sandwich done.  I'm not really happy with how the quilting process wound up.  I learned a couple more things about that.

Click to embiggen

The second photo is the finished quilt.

Click to embiggen

--------

Ok...so the arrows.  From what I saw, the Initial K pattern uses blocks to create the arrows.  My intent was to be able to sew in continuous strips of the gradient material.  To do that, I had to get the pieces in the arrow strips cut just right to match.  There was a fair amount of trial and error, but this ended up working.

Step one was to fold the 2 1/2" wide gradient strip perfectly (or nearly so) in half.  Then I cut a section that is 4 3/8" from the fold.  I found that cutting that section as just slightly less than 4 3/8" worked a little better.  Hold onto the ends and leave them together.

Step two was to cut the color strips.  They were 12 1/2" long.

Step three was to cut the 30° angles at the end of the strips.  The angles were cut to the points.  Leave the gradient strip folded in half.  And make sure you get the angles in the right direction!

Step four was to sew the arrows onto the centerpieces from the gradient material.

Step five was to remove 1 7/8" from the middle portion of the remainder of the gradient strip.

You should be left with an arrow strip that is roughly the same length as an uncut gradient strip.

A modest update.  I did receive a photo of young Lincoln with his quilt.  He's a keeper.


Sunday, January 26, 2020

A Musical Window

I am not a fan of paper piecing in quilting.  It takes a lot of time to get very little accomplished.  I suppose that is why most of the quilts I make are log cabin or some variant of the log cabin pattern.  Put in a strip of fabric, and throw on blocks until you get to the end.

Power quilting!

Therefore, I am always on the hunt for techniques that utilize strips rather than pieces as the foundation for the design.  I approach quilting more as an engineer where mathematics and fabrication are a bit more important than artistic flair.  I also approach quilting as a guy; my color selections lean towards bolder colors and greater contrasts.

Some time ago I ran across the Magic Tiles pattern by Kathleen Bissett.  The process described in the pattern was quite attractive to me.  It offered a mathematic process of construction and a (somewhat) chaotic presentation of color.  Chaos, quite naturally, is also mathematic.

Music is a passion of my mother's.  That may be one reason why she was so enamored of my father when they first met.  I began collecting music-based quilting fabric after finding the Magic Tiles pattern.

Now the first rule of quilting is to follow the instructions.

The second rule of quilting is to know when to break the first rule.

The pattern calls for twelve different fabrics.  I think I ended up using ten.  So the process for randomizing the fabrics didn't work quite as well for me.  I had to do some manual manipulation when it came to the final assembly of the square tiles.

If you look closely, you will probably find some goofs in my assembly of the squares.  The biggest error was in not maintaining consistent seams with the grout strips.  A couple of the grout strips are a little wider than the rest.  I thought that would work out in the end as long as the error stacked up in the same way.

The error did stack up.  And some of the grout runs have a jog in the middle of the tile due to the larger grout strips.  At that point, it was too late to go back and "fix" it.  I pushed on hoping that most people wouldn't see the error.

One other change did work out quite well.  The pattern in the instructions detailed a border that was tight to the inner tiles.  I elected to use a broad black border between the tiles and the colored border.  I then finished out the distance to edge using black fabric.  The dimensions for my final quilt are roughly 66" x 94". 

The photo below is of the quilt just prior to binding.  I had quilted all of the grout in place and wanted to make sure that the top and bottom were smooth before sealing the edges.


I was quite pleased with how the back worked out on this quilt.  My backs end up having bunches far too frequently.  My solution has been to use more flexible, plush backing materials on baby quilts.  For some reason, they don't bunch up.  Or to be frustrated by re-quilting sections.  Or to just live with it.  It isn't bad, it's just not perfect.  The back on this quilt is almost perfect.

Sometimes, you learn all the good stuff after you are done.  In this case, I obviously learned an important lesson about consistent seams.  Log cabin quilts can hide a world of sins.  This pattern....not so much.

I also learned a fair amount about Kathleen Bissett via her website.  She is a degreed educator that thought she would spend her life teaching math.  Life is funny.  She still teaches.  Math is still heavily involved in her work.  But she rarely teaches in a traditional school.  Kathleen also has some very pointed....and correct....thoughts about supporting creators and their copyrights.

If you want to purchase her pattern and your local quilting store can't get it, then you might start by contacting the good people at Quilt Craft.

Tuesday, December 31, 2019

A Quilt for Ella

So short story long, back in the spring, our youngest and his girlfriend announced that they were also having a baby. This was to have been our first grandchild.

If you've read about Miss Emma's quilt, then you know how that expectation worked out.

We spent some time looking at fabrics.  Two of them, pink and purple squares, were ones that I had seen before and had been wanting to try in a quilt.  They posed a bit of a challenge due to the tiny square pattern in the material.  It is quite difficult to cut perfectly parallel successive strips of material from a 40" wide section of fabric.  I ended up cutting 2 1/2" wide x 20" long strips.  Most of the cuts pretty well match the pattern of the squares.

In the end, I was pleased with the result.  And as with Emma's quilt, the backing material for Ella's quilt was a plushy fabric that didn't bunch (much) when sewed.

Miss Ella's Quilt - Finished

Miss Ella's Quilt - Detail


Miss Ella - Her Own Self
We think she's a keeper


Papa Josh and Miss Ella
Catching a little shut eye.

A Quilt for Emma

So here we are late in 2019.  You may have picked up on the suggestion under Charlotte's quilt entry that there was another quilt in the works.

This.....is not that quilt.

So late in September, we received an early morning call from our oldest.  His girlfriend was in labor.  He didn't know she was pregnant.  She didn't know she was pregnant!  There's a longer story there, but the doctors and nurses went to great lengths to express to us that this situation was not as unusual as you might think.

We received another call a couple hours later.  It was still a long way before our alarms were set to go off.  She was dilated to 3.  Off to the hospital we went!  About 6 or 7 hours later, our first grandchild, Emma came into the world.  She was a little early.  The doctors thought that she was at about 34 weeks when she was born.  Her first day was a little rough.  But she was out of the neonatal unit and safe at home a week later. 

She's pretty tough...like her old man.  Her mom, too, for what it's worth.

The only problem is that when I went to sleep the previous night, I had not planned on any extra quilts for 2019.  And now I was planning on another quilt for 2019!

I opted for another pink/grey combination.  It turned out pretty well.

The backs of quilts are always a bit of a challenge for me.  It's hard to come up with something that is visually interesting while also being easy enough to sew.  This time around I opted for a pink/grey synthetic fabric that felt a little plushy.  The fibers weren't crazy long, but they are long enough to be soft to the touch.

My beloved bride thinks I should use soft materials as they will be in contact with the baby's skin.  I think the backing material worked pretty well this time around.  I might have to keep looking at that fabric for future baby quilts.


Miss Emma's Quilt - Finished


Miss Emma's Quilt - Back


Miss Emma - her own self.  Almost 3 months old.
We're still tickled pink to have her in our lives.

A Quilt for Charlotte

A different nephew and his girlfriend also ended up having a baby this year.  We found out about this in the spring.  I had completed one quilt, had a second one in the works, and now a third (or more) racked up in rapid succession.

I wasn't sure what to do for Charlotte.  But knowing that a little girl was coming and knowing that I still had some special fabric left in the stash pile, I just dove in and put together fabrics that I had available.  You may recognize one or two fabrics as being in prior quilts.

I really hate working with flannel.  It isn't dimensionally stable.  You can cut a 2 1/2" wide strip and end up pushing and pulling it so that it ends up being 1/8" on either side.  A continuing set of 1/8" errors is really a pain in the backside when you are piecing the larger squares together.

The "special fabric" was the white flannel with the tiny red roses.  My mother-in-law had purchased a whole bunch of that material with the intent of making nightgowns for two of her granddaughters when they were in the 4 to 6-year-old range.  Both are in their 20s today.  Neither of them got a nightgown.

Mom is gone now.  She is greatly missed.  Now I have/had the material.  As this would be another of her great-grandchildren, I thought it would be a good use.


Charlotte's Quilt - Finished


Charlotte's Quilt - Detail

A Quilt for Chloe

Immediately after finishing Jayce's quilt, I started to work on one for Miss Chloe.  A friend at work was working to produce Chloe, so I thought it would be OK to produce something to keep her warm once she got here.  Chloe and her momma made it through safe and sound.

Instead of doing another log cabin quilt, I took a stab at a little different pattern.  This one is supposed to be inspired by the Death Star from Star Wars.

Is there another Death Star outside of Star Wars?

I picked up the pattern in a quilting magazine because it has a really cool modern art feel to it.  I think it turned out OK.


Chloe's Quilt - Pre-Quilting


Chloe's Quilt - Detail


Chloe's Quilt - Finished

The partial circles were a bit of trouble.  I had to learn/re-learn some things to make them come out correctly.  But this was a fun pattern.  I expect that I will try it again in the future.

A Quilt for Jayce

One of our nephews and his girlfriend had Jayce much earlier this year.  So I put aside my then (now current) quilting to begin working on one for Jayce.  His mom was interested in an animal theme for Jayce.  The result is below.


Jayce's Quilt


Jayce's Quilt - Single Panel

I think it worked out pretty well.  He's a pretty cute bugger, too!

Thursday, January 10, 2013

A Christmas Qulting

2012 was a pretty busy quilting year for me.  And the pay off, such as it was, came on Christmas.  I have made many quilts for friends and family, but I had not made any for my immediate, immediate family, other than for my beloved bride.

Four family members received quilts this year on Christmas Day.  I'll be posting individual entries for each quilt shortly.


Monday, October 15, 2012

Your Neighborhood Quilter

Alright, y'all.  I need a little help figuring out how to assemble a quilt.  The options are below.  Let me know what you think in the comments.

This is the basic block.  It is roughly 21" x 21".

Option 1 - Everything pointed the same way.

Option 2 - Inboard pointed in, Outboard pointed out.

Option 3 - 4 Pack in/out

Option 4 - 4 Pack windmill

Option 5 - Small windmills
I will have the full story after the quilt is assembled and it the recipient has it.